Generate PDF and Word documents from XML data
Posted by admin
How about merging XML data to PDF or Word templates? XML is the universal standard for data interchange.

DIY system for generating PDF and Word documents from JSON data. You can use either the API or the user interface to populate JSON data into existing PDF and Word templates in order to generate documents. It is one of the fastest systems and can generate thousands of complex documents in a few seconds.
You can populate JSON data as-is without any costly data transformations.

In the example below, we generate invoices to send to customers. The invoice details are in a JSON file. We populate them into an invoice template to create several invoices in PDF format. Some of the invoices require a summation of invoice amounts. We then auto-send those invoices to customers through email. Finally, we sync the generated invoices to cloud storage for archival.
EDocGen is one of the fastest systems that generate thousands of complex PDF documents in a few seconds. It is a business-user-friendly DIY system for generating PDF documents from JSON data. They can use existing PDF or Word templates for documents generation.
Below are the sample invoice template and the JSON array that we are going to populate.

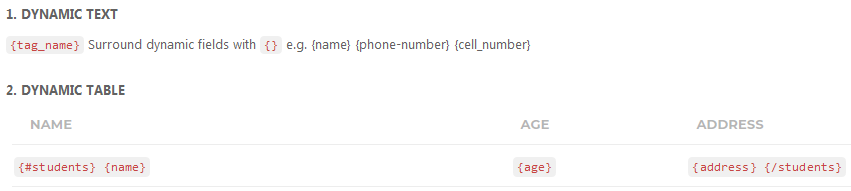
The template has dynamic text, table, and image fields, apart from calculations and conditional statements.
Text: {Invoice_Number} and {Invoice_Date} are dynamic text fields. EDocGen treats text placed in {} as a dynamic text field.
Table: The invoice table(IT) has item description and Amount columns. The table starts with {#tablename} and ends with {/tablename}. So you
notice {#IT} in the first
column and {/IT} in the last column. Column values are similar to text fields. Hence you find {Item_description} and {Amount} in table columns. The system loops
over the JSON array to populate rows into the Job table.
Image: The image tag {%logo} populates the logo from the image URLs or files uploaded into the system. {%ImageField} is the tag for
populating images. You can
also set the dimensions of the image.
The image dimensions are optional and they automatically resize the image to the desired dimensions.
Show text based on Conditions (If-Else): If the language is English, {#Lang == "English"} displays English content blocks/paragraphs. This way, you can create multi-lingual documents from a single master template.
In the invoice table, {IT | summation:'Amount' | format_number: ",”} calculates the sum of the Amounts and formats it.
While adding tags to the template,
Add dynamic tags to your existing template as detailed in the above sections. The next step is to populate it with JSON data.
After adding tags to your template, upload it to the system.
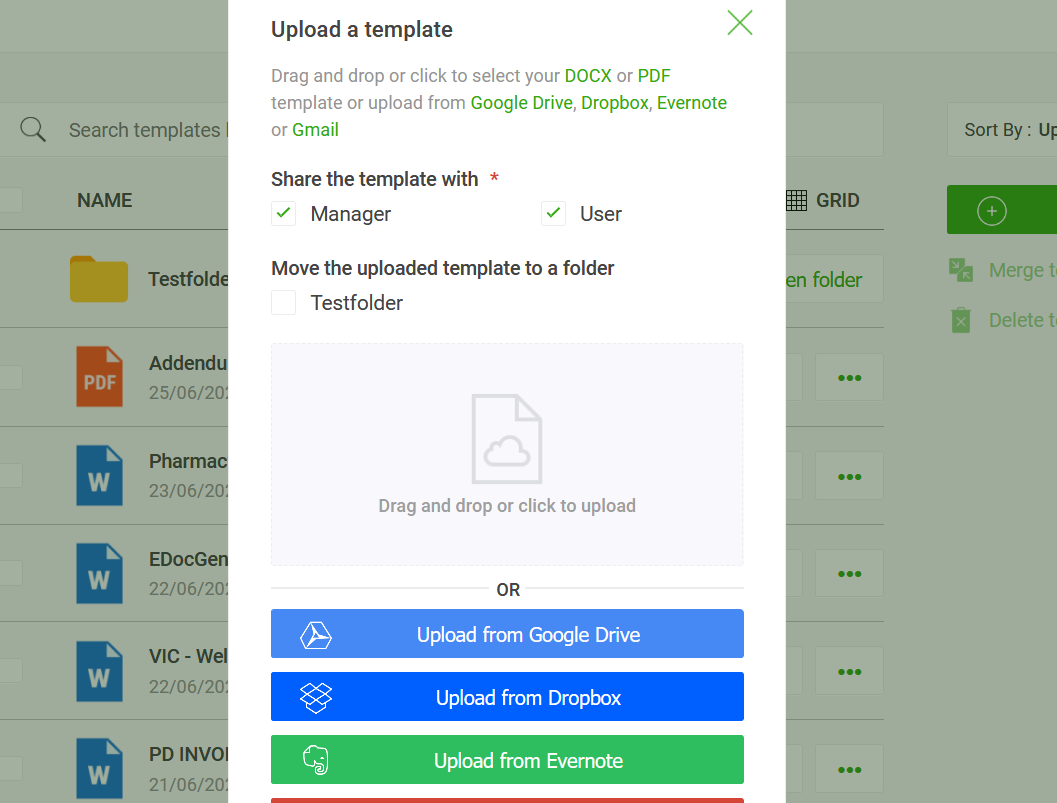
Click on the "Generate" button against the uploaded template. This opens the document generation options pop-up. Select the “Upload data" option. You can populate JSON data as-is without any costly data transformations.

Upload JSON and map JSON keys to the template's dynamic fields. If you have a large number of dynamic fields, mapping them for every population is time-consuming. If JSON key names match with the template's dynamic fields, EDocGen automatically maps them. This allows you to skip the mapping screen during documents creation.
In the JSON file, notice keys matching with the template's dynamic filed names. For example, "Enter_Name" is present in both JSON and template. Though you can upload any valid JSON format, having matching keys allows you to skip the mapping screen (2nd step of the population). Thus this saves time if you're planning to populate the same JSON file format again and again into your template.
For "linkname" dynamic field, there is no corresponding data in JSON. In such cases, the generated documents display just blank in the place of the dynamic field.
In the third step, click the generate button to create JSON to PDF documents. If you're generating multiple documents from your JSON (bulk documents), you find generated PDF documents in zip format in the output folder. Otherwise, the system creates a single PDF file. You can download the generated files from the output folder.
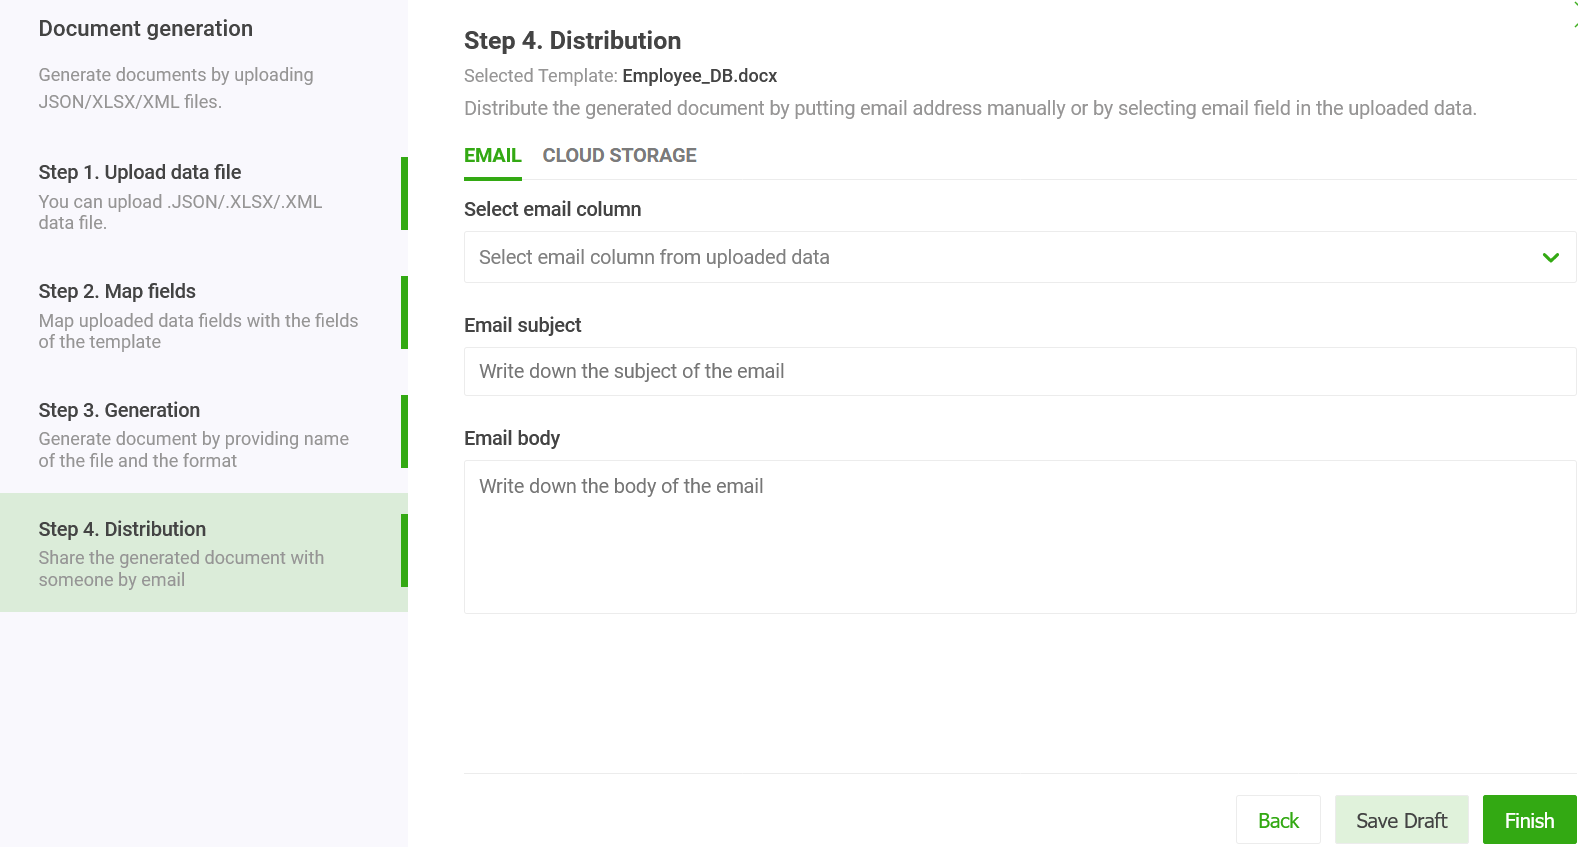
If you are only looking to generate files, ignore this step. Let's say you want to send these generated invoices to customers as attachments, with a custom email subject and body from your business email. The system supports sending PDFs from Office 365, GSuite, SendGrid, and SES.
The system then generates and sends the relevant invoices to each customer.
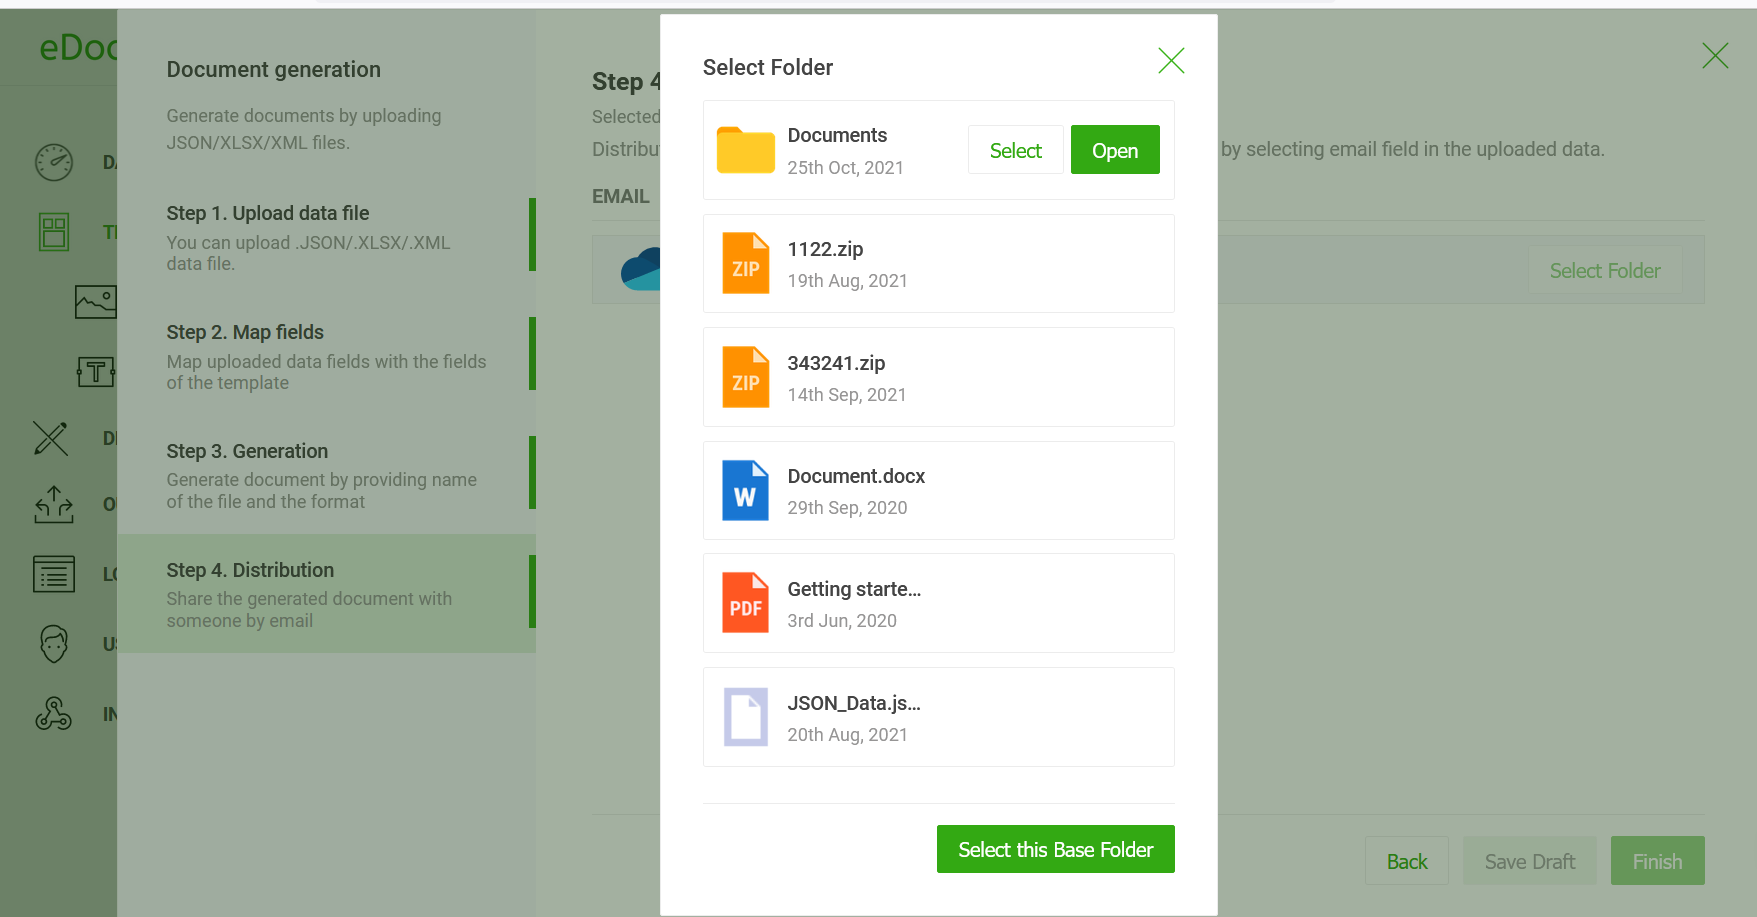
Apart from Email, the system offers various distribution channels including E-Sign, Print, Cloud storage, etc. The below diagram depicts how you can sync the generated invoices to OneDrive for archival.
You can use both PDF and Word templates with EDocGen. Edit them in your favorite editors to add tags and upload them into EDocGen. While you can modify your templates inside the App as well, it is suited more for minor changes.

With EDocGen, you can populate JSON into
For read-only PDF, open it in Adobe Acrobat editor or your favorite PDF editor. Then add tags, similar to the Word document template above.
For fillable PDFs, you can use the template as-is.
It is an API-first product and offers REST API for on-demand (real-time) and bulk generation of PDF documents from JSON data. You can also pass a string instead of a JSON file. Following is the cURL.
curl -X POST "https://app.edocgen.com/api/v1/document/generate" -H  "accept: application/json" -H
"x-access-token: eyJ0eXAiOiJKV1QiLCJhbGciOiJIUzI1NiJ9.eyJpc3MiOiJtdXJ0aHlAZWRvY2dlbi5jb20iLCJleHAiOjE2NjYxODcyNzIyNDMsInVybHMiOnsiKiI6WyJnZXQiLCJwdXQiLCJwb3N0IiwiZGVsZXRlIl19fQ.W0Dh6Ux0uJop8Z-j1N75AtOWa4DvA7UoSbIX06pFwAw" -H
"Content-Type: application/json" -d "{  \"documentId\": \"632c2fc09e055e5d826bef2d\",  \"markers\": {\"Invoice_Number\":\"001\", \"PO_Reference\":\"PO1\"},  \"format\": \"docx\",  \"outputFileName\": \"test\"}"
the system supports 8-Level JSON data. Thus, you can create a table inside a table and nested loops.
{#Section}
    {#item}
        {#sectionID}
            {name}
        {/ sectionID }
    {/item}
{/Section}At the time of generation, you can set the password for the generated pdf. The password can be mailed to the user along with the pdf attachment.
You can populate image URLs and Base64 strings.
The content blocks section in the help guide details paragraph population.
The system treats text placed in "{~}" as a hyperlink. The field {~Enter_Email} in the template creates a dynamic hyperlink
Apart from this, you can use the system to generate
Below is an additional example for a 2-level JSON population. The sample template has loops inside a loop to create a single page for each JSON record. Moreover, it creates lists with bullets.
Below is the template and JSON array.
The system loops over all the nouns in the JSON to populate associated records for each noun in the template.
In the template notice the loop {#Nouns}{/Nouns}
{#ExampleSentences} {.}{/ExampleSentences}
{#Antonyms} {.}{/Antonyms}
{#Synonyms} {.}{/Synonyms}
Use this example as a reference for list creation and as a multi-level JSON population. If you have any queries on JSON file to PDF generation, mail us support(@)edocgen.com. We would be happy to answer.
It may be due to the wrong dynamic tags. Just make sure you're only using the tags that are supported by EDocGen.
Please validate your JSON file. This happens if your JSON file is not valid.
Please validate your JSON file. This happens if your JSON file is not valid.
Posted by admin
How about merging XML data to PDF or Word templates? XML is the universal standard for data interchange.
Posted by admin
If your organization is creating a large number of fillable PDF or read-only PDF documents from Excel
Posted by admin
Automate generation of Microsoft Word documents from JSON data. Supports 8-level JSON for creation of nested loops and lists